Replacing Old Website Templates in Dreamweaver
Part 1 - Overwriting a Single Template
Part 2 - Replacing Multiple Templates with One
©2009 By Jefferis Kent Peterson, I
Peterson Design Studio
http://www.PetersonSales.com
This article available for free reprint. See conditions at the bottom of part 2.
One of the most difficult tasks for a web designer is updating legacy websites. Legacy websites are websites which have existed for many years. Often these sites have outdated code or are badly in need of an upgrade. For years, Dreamweaver has used templates to allow an entire site to be updated at once simply by making changes to a master page. But what do you do when the template itself was developed with outdated code and the site needs a complete design overhaul? How do you fix it without having to cut and paste the content from every existing page to a newly designed one?
In the early days of web page development, using tables for page layout was standard operating procedure. CSS did not work. Reliable, hierarchical navigation menu systems did not exist, so it was easier for a developer to create multiple templates for various sections of a website with tables for links. For example, one template might cover category pages, while another would cover catalog pages. One site I developed over the course of 14 years had 6 active templates. I was faced with a dilemma. The site badly needed a new design and new code, but how could I update the templates and 300 pages of static web content without spending weeks of labor? The answer came through experimentation with a two-step process in Dreamweaver.
Overwriting a Single Template
With trepidation and fear of making a colossal mess of things, I backed up the site I wanted to modify. If you have ever updated an entire site with Dreamweaver’s find and replace feature to discover you have destroyed valid code in every document, a good back up is a helpful thing, so I recommend you do the same before attempting my solutions.
The first step in replacing an existing template is to make a copy of the outdated template and give it a new name. Just put that copy aside for safekeeping. After you have created a new page design for the site’s new layout, save the new page as a template in Dreamweaver (choose File > Save As Template). In this case, I named the new template 2009. The next step is to open the old template and look at its editable regions. There will be regions called Doctitle and an editable Head, which will also exist on your new template by default. You do not have to worry about those two, but you need to pay attention to the user created editable regions. Look in the code for areas that are enclosed by tags that begin and end with the word editable. Here’ is an example of the code for an editable footer region:
<!-- TemplateBeginEditable name="footer" --> Footer content goes here<!-- TemplateEndEditable -->
Let’s say you have three editable regions in your old template called leftColumn, mainContent, and footer. In order to overlay the new template on the old, you need to create the same editable regions on the new template and give them exactly the same names, matching upper and lower cases (choose Insert > Template Objects > Editable Region). Your leftColumn in the new design can appear anywhere on the page you want. It does not have to be a left column, but just remember that whatever content appears in the current template’s left column will now appear on the new page in the area you have defined as the leftColumn. And any region you do not include in the new template will be lost when you update the existing pages.

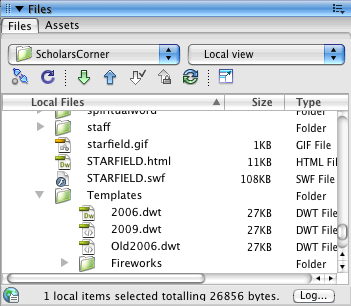
After you have designed your new page and have matched the editable areas, you are now ready to take the plunge. Close all your documents and look at these pages in File View in Dreamweaver (fig 1 above). Rename your original template. Say your site template was called 2006.dwt (dwt is the Dreamweaver file extension for templates). Rename it to something like Old2006.dwt. When Dreamweaver asks you if you want to update other pages and links, click no. Next, rename a copy of your new 2009 template. In this case, name it 2006.dwt. Dreamweaver will now see all the child pages created by the original 2006 template linked to this new file. Open the new 2006 template. Since editable regions do not get updated when you make a change on the template, you can safely make changes in those regions without changing your existing child pages. So, in any editable region, just type a space and then select Save. When Dreamweaver asks you if you want to update the child pages in the site, click yes. Every child page, which uses the 2006 template, will be updated to the new design. If there are areas that do not match, for example if you misnamed the footer region as FOOTer, Dreamweaver will warn you and ask you to resolve the conflict in a dialog box. However, I would not rely on this dialog box to fix your problems. If you can, just cancel the update and figure out what you did wrong. Make sure the editable regions’ names match exactly. Once the pages match and the update is complete, your 2006 pages will now have the new 2009 design.
on to Part 2...Turning a Website with Multiple Templates into a Website with One Template.
